本文最后更新于:2023年9月25日 下午
1 一些笔记
在当前目录(.)下创建一个新的软盘镜像a.img
mkfs.fat -F 12 -C a.img 1440
bootloader使用

加入内核

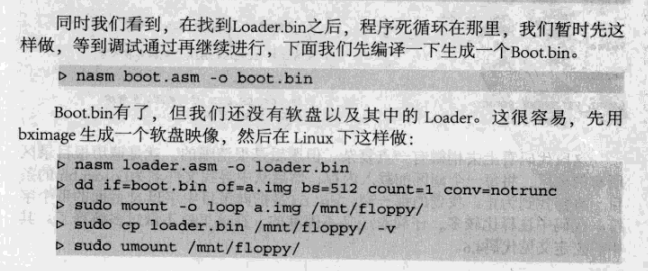
改用
ld -m elf_i386 -s -o kernel.bin kernel.o
Makefile
1
2
3
4
5
6
7
8
9
10
11
12
13
14
15
16
17
18
19
20
21
22
23
24
25
26
27
28
29
30
31
32
33
34
35
36
37
38
39
40
41
42
43
44
45
46
47
48
49
50
51
52
53
54
55
56
57
58
59
60
61
62
63
64
65
66
67
68
69
70
71
72
73
74
75
76
77
78
79
|
ENTRYPOINT = 0x30400
ENTRYOFFSET = 0x400
ASM = nasm
DASM = ndisasm
CC = gcc
LD = ld
ASMBFLAGS = -I boot/include/
ASMKFLAGS = -I include/ -f elf
CFLAGS = -I include/ -c -fno-builtin
LDFLAGS = -s -Ttext $(ENTRYPOINT)
DASMFLAGS = -u -o $(ENTRYPOINT) -e $(ENTRYOFFSET)
ORANGESBOOT = boot/boot.bin boot/loader.bin
ORANGESKERNEL = kernel.bin
OBJS = kernel/kernel.o kernel/start.o lib/kliba.o lib/string.o
DASMOUTPUT = kernel.bin.asm
.PHONY : everything final image clean realclean disasm all buildimg
everything : $(ORANGESBOOT) $(ORANGESKERNEL)
all : realclean everything
final : all clean
image : final buildimg
clean :
rm -f $(OBJS)
realclean :
rm -f $(OBJS) $(ORANGESBOOT) $(ORANGESKERNEL)
disasm :
$(DASM) $(DASMFLAGS) $(ORANGESKERNEL) > $(DASMOUTPUT)
buildimg :
dd if=boot/boot.bin of=a.img bs=512 count=1 conv=notrunc
sudo mount -o loop a.img /mnt/floppy/
sudo cp -fv boot/loader.bin /mnt/floppy/
sudo cp -fv kernel.bin /mnt/floppy
sudo umount /mnt/floppy
boot/boot.bin : boot/boot.asm boot/include/load.inc boot/include/fat12hdr.inc
$(ASM) $(ASMBFLAGS) -o $@ $<
boot/loader.bin : boot/loader.asm boot/include/load.inc \
boot/include/fat12hdr.inc boot/include/pm.inc
$(ASM) $(ASMBFLAGS) -o $@ $<
$(ORANGESKERNEL) : $(OBJS)
$(LD) $(LDFLAGS) -o $(ORANGESKERNEL) $(OBJS)
kernel/kernel.o : kernel/kernel.asm
$(ASM) $(ASMKFLAGS) -o $@ $<
kernel/start.o : kernel/start.c include/type.h include/const.h include/protect.h
$(CC) $(CFLAGS) -o $@ $<
lib/kliba.o : lib/kliba.asm
$(ASM) $(ASMKFLAGS) -o $@ $<
lib/string.o : lib/string.asm
$(ASM) $(ASMKFLAGS) -o $@ $<
|
=定义变量
${XXX}使用变量
标准语法
1
2
| target: prerequsites
command
|
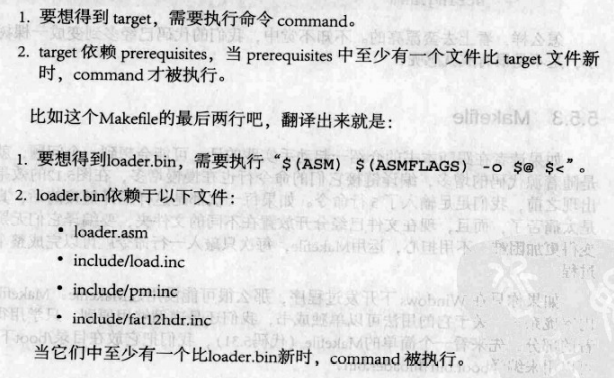
$@代表target
$<代表prerequisites的第一个名字
踩坑
- ld参数要加上
-m elf_i386
- gcc参数要加上
-m32
code
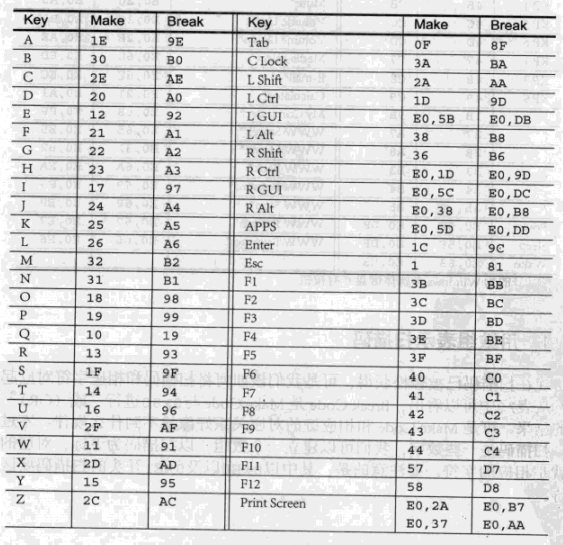
- break code是make code与0x80进行or操作得到的结果
2 实现
2.1 base
将orange书中的chapter7/n复制过来,跑一下
注意修改makefile里的坑
发现已经实现了以下的基本功能
- ⽀持回车键换⾏。
- 支持空格键,不支持tab。
- ⽀持⽤退格键删除输⼊内容。
- 可以输⼊并显⽰ a-z,A-Z 和 0-9 字符。
基本框架有了,就在其基础上做实现就可以,一个个来
2.2 清屏
目的:从从屏幕左上⻆开始,以白色显示键盘输入的字符。
实现:
- 在初始化之前将整个屏幕打印满空格,然后把指针移到最前面
在main.c中加入以下方法
1
2
3
4
5
6
7
8
9
|
void cleanScreen(){
disp_pos = 0;
int i;
for (i = 0 ; i < SCREEN_SIZE; ++i){
disp_str(" ");
}
disp_pos = 0;
}
|
2.3 tab支持
2.3.1 支持输入
至此已经可以实现TAB的输入了,但是关于删除还没解决,这时候删除一次还只能删除一个空格,TAB要删除四次
2.3.2 支持删除
在用书上代码的时候,发现除了TAB退格有问题,换行的退格也有问题
按照源代码,换行后退格,会退到上一行的最后位置
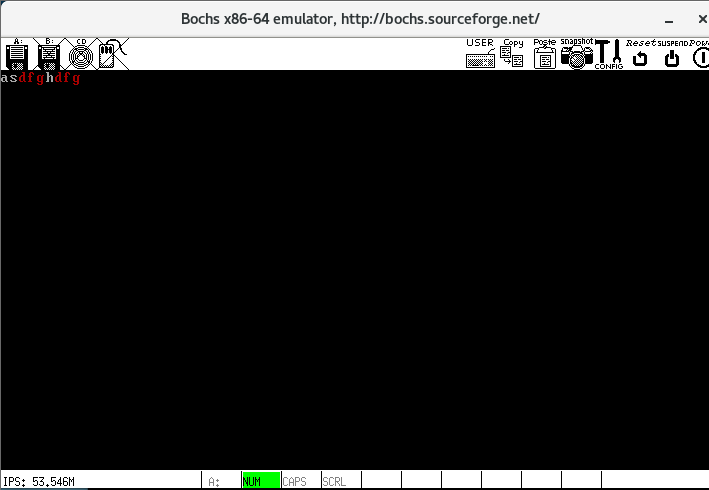
这显然不是之前的位置,所以很直观的想法就是在打印之前,拿一个变量来存储前一个位置
但是存一个位置显然是不够的,得存每个走过的位置,所以需要拿一个栈来存
2.4 shift组合键
发现在keyboard.c里,orange帮我们实现好了,那没事了。
2.5 清屏
目的:每隔20s清屏
实现:很直接的想法,在定时进程TestA里进行修改
1
2
3
4
5
6
7
8
9
| void TestA()
{
int i = 0;
while (1) {
cleanScreen();
milli_delay(100000);
}
}
|
发现是可以的,但是光标不会复位,所以需要重新初始化screen
在tty.c中添加方法
1
2
3
4
5
6
7
8
9
|
PUBLIC void init_all_screen(){
TTY *p_tty;
for (p_tty = TTY_FIRST; p_tty < TTY_END; p_tty++)
{
init_screen(p_tty);
}
select_console(0);
}
|
修改后的TestA为:
1
2
3
4
5
6
7
8
9
10
| void TestA()
{
int i = 0;
while (1) {
cleanScreen();
init_all_screen();
milli_delay(100000);
}
}
|
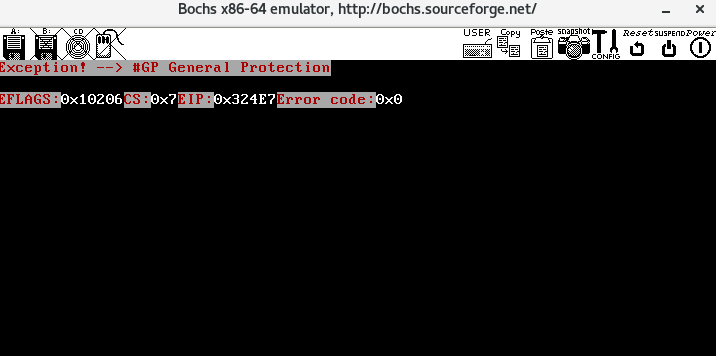
运行完发现报错了
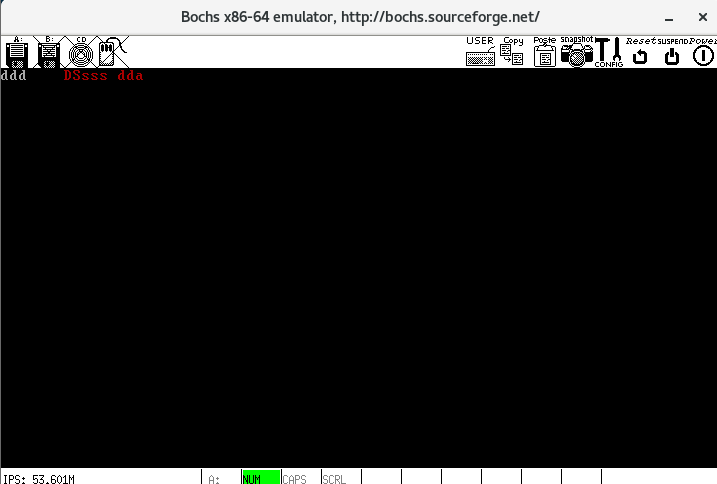
查了各种资料,发现大概是因为用户进程不能使用tty里的方法?
尝试将TestA的进程从PROCS转为TASKS
1
2
3
4
5
6
7
8
9
10
11
12
13
14
15
16
|
PUBLIC TASK task_table[NR_TASKS] = {
{task_tty, STACK_SIZE_TTY, "tty"},
{TestA, STACK_SIZE_TESTA, "TestA"}};
PUBLIC TASK user_proc_table[NR_PROCS] = {
{TestB, STACK_SIZE_TESTB, "TestB"},
{TestC, STACK_SIZE_TESTC, "TestC"}};
#define NR_TASKS 2
#define NR_PROCS 2
|
至此,完成清屏,但是后面还需要进行修改。
2.6 ESC
2.6.1 切换模式/输出红色
需要记录模式状态,加入代码
1
2
3
4
5
6
7
8
9
|
PUBLIC int mode;
extern int mode;
|
响应的,只有mode==0的时候可以清屏,所以需要修改
1
2
3
4
5
6
7
8
9
10
11
12
13
14
| void TestA()
{
int i = 0;
while (1) {
if(mode==0){
cleanScreen();
init_all_screen();
milli_delay(100000);
}else{
milli_delay(10);
}
}
}
|
在tty.c中加入代码
1
2
3
4
5
6
7
8
9
10
11
12
13
| PUBLIC void in_process(TTY *p_tty, u32 key)
{ ...
case ESC:
if(mode==0){
mode = 1;
}else if(mode==1){
mode = 0;
}
break;
...
}
|
修改console.c中
1
2
3
4
5
6
7
8
9
10
11
12
13
14
15
16
17
18
19
| PUBLIC void out_char(CONSOLE* p_con, char ch)
{
...
default:
if (p_con->cursor <
p_con->original_addr + p_con->v_mem_limit - 1) {
*p_vmem++ = ch;
if(mode==0){
*p_vmem++ = DEFAULT_CHAR_COLOR;
}else{
*p_vmem++ = RED;
}
push_pos(p_con,p_con->cursor);
p_con->cursor++;
}
break;
}
...
}
|
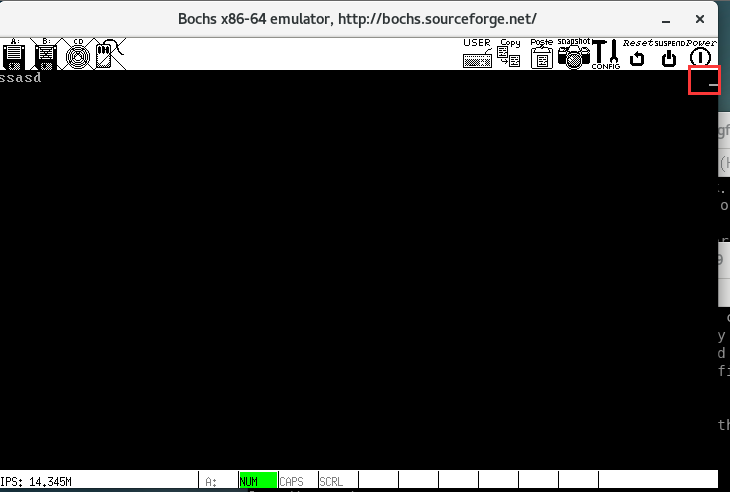
完成
2.6.2 搜索输入栈
搜索模式下输入需要做的事情有:
- 记录输入的字符(其实不用,因为从显存里就可以拿到)
- 记录输入开始的位置(以便退出ESC的时候清空输入)
修改console.h,加入搜索输入栈、并在CONSOLE和POSSTACK中开辟变量,记录ESC开始位置
1
2
3
4
5
6
7
8
9
10
11
12
13
14
15
16
17
18
|
typedef struct cursor_pos_stack
{
int ptr;
int pos[SCREEN_SIZE];
int search_start_ptr;
}POSSTACK;
typedef struct s_console
{
unsigned int current_start_addr;
unsigned int original_addr;
unsigned int v_mem_limit;
unsigned int cursor;
unsigned int search_start_pos;
POSSTACK pos_stack;
}CONSOLE;
|
(1)实现退出时光标复位
在console.c中增加方法
1
2
3
4
5
6
7
8
9
10
11
12
13
14
15
16
17
18
| PUBLIC void exit_esc(CONSOLE* p_con);
PUBLIC void exit_esc(CONSOLE* p_con){
u8* p_vmem = (u8*)(V_MEM_BASE + p_con->cursor * 2);
int i;
for(i=0;i<p_con->cursor-p_con->search_start_pos;++i){
*(p_vmem-2-2*i) = ' ';
*(p_vmem-1-2*i) = DEFAULT_CHAR_COLOR;
}
p_con->cursor = p_con->search_start_pos;
p_con->pos_stack.ptr = p_con->pos_stack.search_start_ptr;
flush(p_con);
}
|
(2)搜索
console.c中,新增一个方法,直接暴力匹配了
1
2
3
4
5
6
7
8
9
10
11
12
13
14
15
16
17
18
19
20
21
22
23
24
25
26
27
| PUBLIC void search(CONSOLE *p_con);
PUBLIC void search(CONSOLE *p_con){
int i,j;
int begin,end;
for(i = 0; i < p_con->search_start_pos*2;i+=2){
begin = end = i;
int found = 1;
for(j = p_con->search_start_pos*2;j<p_con->cursor*2;j+=2){
if(*((u8*)(V_MEM_BASE+end))==*((u8*)(V_MEM_BASE+j))){
end+=2;
}else{
found = 0;
break;
}
}
if(found == 1){
for(j = begin;j<end;j+=2){
*(u8*)(V_MEM_BASE + j + 1) = RED;
}
}
}
}
|
在tty.c的in_process()中调用
1
2
3
4
5
6
7
| case ENTER:
if(mode==0){
put_key(p_tty, '\n');
}else if(mode==1){
search(p_tty->p_console);
}
break;
|
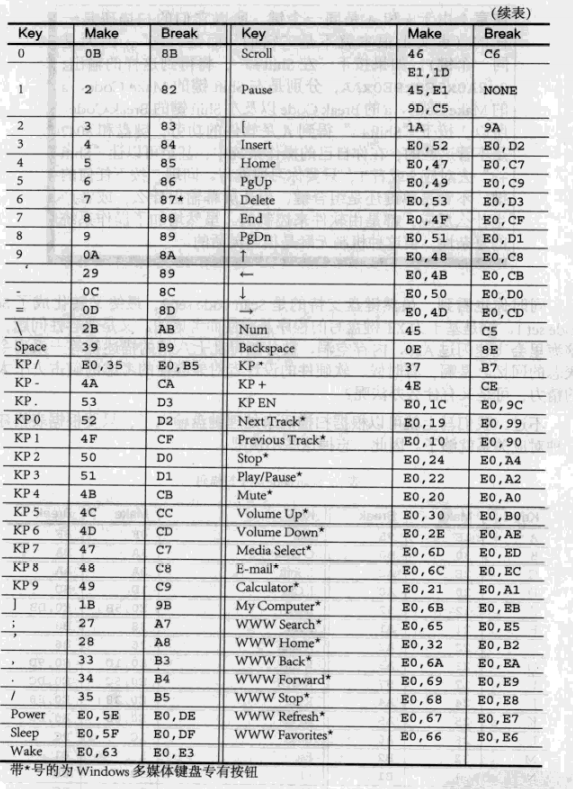
完成了,但是还有以下问题没有解决:
- 退出的时候颜色变回白色
- 按回车后,屏蔽除了ESC外的输出
(3)退出的时候颜色变回白色
在(1)中的exit_esc代码中加上以下循环即可
1
2
3
| for(i=0;i<p_con->search_start_pos*2;i+=2){
*(u8*)(V_MEM_BASE + i + 1) = DEFAULT_CHAR_COLOR;
}
|
(4)按回车后,屏蔽除了ESC外的输出
给mode加一个定义
在mode1下输入enter时切换到mode2
1
2
3
4
5
6
7
8
| case ENTER:
if(mode==0){
put_key(p_tty, '\n');
}else if(mode==1){
search(p_tty->p_console);
mode = 2;
}
break;
|
在tty.c中的in_process进入处理前进行判断
1
2
3
4
5
6
7
8
9
10
11
|
if (mode == 2)
{
if ((key & MASK_RAW) == ESC)
{
mode = 0;
exit_esc(p_tty->p_console);
}
return;
}
|
2.7 撤销
按下 control + z 组合键可以撤回操作(包含回车和 Tab 和删除),直到初始状态。
2.7.1 识别control+z
先不管撤销,先识别出来,然后打印一个*
1
2
3
4
5
6
7
8
9
|
extern int control;
PUBLIC int control;
|
在keyboard.c的keyboard_read中添加
1
2
|
control = ctrl_l||ctrl_r;
|
在console.h中,在out_char()方法中添加
1
2
3
4
5
6
7
8
9
10
11
12
13
14
15
16
17
18
19
| case 'z':
case 'Z':
if(control){
ch = '*';
}
default:
if (p_con->cursor <
p_con->original_addr + p_con->v_mem_limit - 1) {
*p_vmem++ = ch;
if(mode==0){
*p_vmem++ = DEFAULT_CHAR_COLOR;
}else{
*p_vmem++ = RED;
}
push_pos(p_con,p_con->cursor);
p_con->cursor++;
}
break;
|
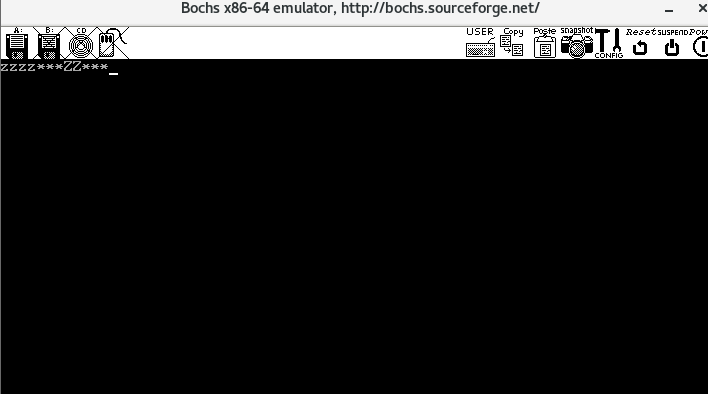
ok,control+z已经能够识别了,接下来做撤销操作。
2.7.2 撤销操作
可以撤回操作(包含回车和 Tab 和删除),直到初始状态。
说白了,就是要记录每一步操作
(1)mode0
在console.h中新增数据结构
1
2
3
4
5
6
7
8
9
10
11
12
13
14
15
16
17
| typedef struct out_char_stack
{
int ptr;
char ch[SCREEN_SIZE];
}OUTCHARSTACK;
typedef struct s_console
{
unsigned int current_start_addr;
unsigned int original_addr;
unsigned int v_mem_limit;
unsigned int cursor;
unsigned int search_start_pos;
POSSTACK pos_stack;
OUTCHARSTACK out_char_stack;
}CONSOLE;
|
在tty.c中,write的时候将out_char的ch压入操作记录栈
1
2
3
4
5
6
7
8
9
10
11
12
13
14
15
16
17
18
19
20
21
| PRIVATE void tty_do_write(TTY *p_tty)
{
if (p_tty->inbuf_count)
{
char ch = *(p_tty->p_inbuf_tail);
p_tty->p_inbuf_tail++;
if (p_tty->p_inbuf_tail == p_tty->in_buf + TTY_IN_BYTES)
{
p_tty->p_inbuf_tail = p_tty->in_buf;
}
p_tty->inbuf_count--;
push_out_char(p_tty->p_console,ch);
out_char(p_tty->p_console, ch);
}
}
PUBLIC void push_out_char(CONSOLE* p_con,char ch){
p_con->out_char_stack.ch[p_con->out_char_stack.ptr++]=ch;
}
|
判断control+z,进行撤销
1
2
3
4
5
6
7
8
9
10
11
12
13
14
15
16
17
18
19
20
21
22
| case 'z':
case 'Z':
if(control){
if(mode==0){
disp_pos = 0;
int i;
for (i = 0 ; i < SCREEN_SIZE; ++i){
disp_str(" ");
}
disp_pos = 0;
p_con->pos_stack.ptr = 0;
p_con->cursor = disp_pos / 2;
flush(p_con);
redo(p_con);
return;
}
}
|
具体撤销方法使用redo实现
1
2
3
4
5
6
7
8
9
10
11
12
13
14
15
|
PRIVATE void redo(CONSOLE *p_con){
p_con->out_char_stack.ptr-=2;
if(p_con->out_char_stack.ptr<=0){
p_con->out_char_stack.ptr=0;
return;
}
int i;
for(i=0;i<p_con->out_char_stack.ptr;++i){
out_char(p_con,p_con->out_char_stack.ch[i]);
}
}
|
(2)mode1
加入数据结构search_start_ptr
1
2
3
4
5
6
| typedef struct out_char_stack
{
int ptr;
char ch[SCREEN_SIZE];
int search_start_ptr;
}OUTCHARSTACK;
|
修改mode切换的出入口相应地方
1
2
3
4
5
6
7
8
9
10
11
|
p_tty->p_console->search_start_pos = p_tty->p_console->cursor;
p_tty->p_console->pos_stack.search_start_ptr = p_tty->p_console->pos_stack.ptr;
p_tty->p_console->out_char_stack.search_start_ptr = p_tty->p_console->out_char_stack.ptr;
p_con->cursor = p_con->search_start_pos;
p_con->pos_stack.ptr = p_con->pos_stack.search_start_ptr;
p_con->out_char_stack.ptr = p_con->out_char_stack.search_start_ptr;
|
control+Z操作
1
2
3
4
5
6
7
8
9
10
11
12
13
14
15
16
17
18
19
20
21
22
23
24
| case 'Z':
if(control&&(mode==0||mode==1)){
int temp;
if(mode==0){
temp = 0;
p_con->pos_stack.ptr = 0;
}else if(mode==1){
temp = p_con->search_start_pos*2;
p_con->pos_stack.ptr = p_con->pos_stack.search_start_ptr;
}
disp_pos = temp;
int i;
for (i = 0 ; i < SCREEN_SIZE; ++i){
disp_str(" ");
}
disp_pos = temp;
p_con->cursor = disp_pos / 2;
flush(p_con);
redo(p_con);
return;
}
|
其中的redo方法也有修改
1
2
3
4
5
6
7
8
9
10
11
12
13
14
15
16
17
18
19
20
|
PRIVATE void redo(CONSOLE *p_con){
int start;
if(mode==0){
start = 0;
}else if(mode==1){
start = p_con->out_char_stack.search_start_ptr;
}
p_con->out_char_stack.ptr-=2;
if(p_con->out_char_stack.ptr<=start){
p_con->out_char_stack.ptr=start;
return;
}
int i;
for(i=start;i<p_con->out_char_stack.ptr;++i){
out_char(p_con,p_con->out_char_stack.ch[i]);
}
}
|
2.8 TAB识别
空格和Tab识别要区分开
在console.h中定义一个特殊的颜色,其实是啥都行,这里用的是绿色
1
| #define TAB_CHAR_COLOR 0x2
|
输出TAB的时候,改用TAB_CHAR_COLOR,反正也看不见颜色
1
2
3
4
5
6
7
8
9
10
11
12
| case '\t':
if(p_con->cursor < p_con->original_addr +
p_con->v_mem_limit - TAB_WIDTH){
int i;
for(i=0;i<TAB_WIDTH;++i){
*p_vmem++ = ' ';
*p_vmem++ = TAB_CHAR_COLOR;
}
push_pos(p_con,p_con->cursor);
p_con->cursor += TAB_WIDTH;
}
break;
|
修改搜索逻辑,添加一个if分支,对空格进行特殊判断即可,遇到空格的时候往后看一步颜色
1
2
3
4
5
6
7
8
9
10
11
12
13
14
15
16
17
18
19
20
21
22
| if(*((u8*)(V_MEM_BASE+end))==' '){
if(*((u8*)(V_MEM_BASE+j))!=' '){
found = 0 ;
break;
}
if(*((u8*)(V_MEM_BASE+end+1))==TAB_CHAR_COLOR){
if(*((u8*)(V_MEM_BASE+j+1))==TAB_CHAR_COLOR){
end+=2;
}else{
found = 0;
break;
}
}else{
end+=2;
}
}
else if(*((u8*)(V_MEM_BASE+end))==*((u8*)(V_MEM_BASE+j))){
end+=2;
}else{
found = 0;
break;
}
|


